Every girl is not born with those glossy Maggie curls, but they simply desire to get that look every single day. In that case, salons are the best choice as they can help you to get the desired look with the help of the pros. But, sometimes it becomes impossible to take a trip to the salon. This is when you either don’t have the that much spare time or do not want to waste your bucks on the salon when you can easily get it sitting back home. So, all those ladies who can relate to whatsoever I previously said, we are the solution for you. In this writing piece, we will be discussing a few easy and simple ways to curl your hair at home. All you need to play the salon pro is:
- Sitting area.
- A Curler.
- Flatiron
- Rollers
- Heat protective spray.
- Setting spray.
- And other on the spot necessities.
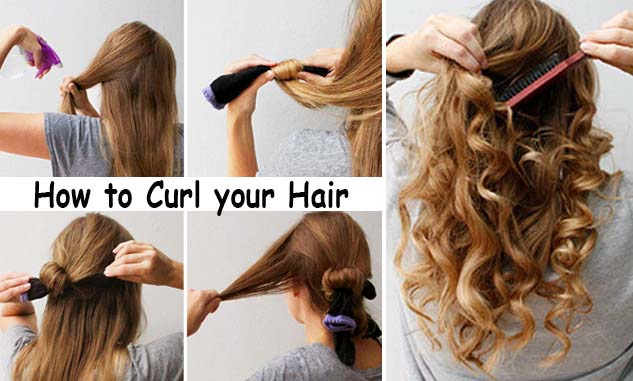
Steps to Curl Your Hair at Home
Contents [hide]
1.) Heat the Curling Iron
- The very first step to curl your hair is heating the curling rod. Plug in the wire and keep your tool at a place where it can rest and heat, without being disturbed. Also, keep in mind to keep away all those items that can get burned when comes in contact with the curling rod.
- Check the temperature of the rod after every interval to ensure the intensity of heat that you require for your hair. A few of these curling rods come with different heating settings. You can simply play them around to achieve the best results.
- Make sure you don’t heat the curling rod up to a limit that can damage your hair or even end up burning your hair. A temperature guide for your hair recommends 320 degrees F for fine hair texture and 30 degrees F for thicker hair.
- In case you are using a flat iron for curling, it should be 2-5 -5 cm in width and a flat paddle style iron will not work for the curls. The good temperature guide recommends a temperature of 320 degrees F for fine hair and 220 degrees F for thicker hair.
2.) Completely Dry Your Hair to Completely
- The second step to turn your hair is, to dry your hair. Drying out your hair is one of the most important steps as using a hot curling rod on wet hair can easily damage the hair even on a low heat. So, use a good quality towel to completely soak the water from your hair leaving them dry.
- In case the water still remains on your hair strands, use a blow dry in order to eliminate any damp spots. But, always avoid using a blow dry as much as possible. This is too much of blow-drying can also damage your hair over time.
- So, wait it out for the hair to completely dry. Meanwhile, you can finish other works that you won’t be able to do when busy playing a salon pro.
3.) Entangle Your Hair
The third step to curl your hair is to eliminate the knots. Use a soft teeth hair brush to untangle the hair and eliminate the knots if any. In order to play it well, first, work with the bottom few inches and then work up your way to the whole length of your strands. This makes the curling process easier as you don’t have to do this in the mid of the whole process.
4.) Use a Heat Protection Spray
Moving forward to curl your hair, the fourth step is to apply a heat protection spray. Another important product is the heat protection spray. This prevents your hair from getting damaged due to excessive heat. It also retains the moisture and prevents the dryness of your hair strands.
All you need to do is get a good quality, branded Heat protection spray and smear it all over your hair before applying the heating rod.
5.) Divide the Hair into Sections
The fifth steps to curl your hair deals with the sections of your hair. Working with sections give better results, this is because you can easily pay attention to each of that section ensuring effective curls.
- Start by clipping the top section of your hair that is the hair covering the area of your head just above your ears.
- When done, come to the bottom section and start curling them. Once you are finished curling, unclip the top section and grab a layer of your hair, clipping the rest again.
- Continue this process until every strand of your hair is perfectly curled as to what you desire. Taking bigger sections will give you loose curl while smaller sections will result in tighter ringlets.
6.) Start the Curling procedure
Ths sixth and the very important step to curl your hair is the actual curling procedure. Now that you are done with all the pre-procedures it’s time to curl them up. Begin with the lower half of your hair further dividing them into smaller sections.
- Work with one section at a time. Take a section and roll it over the curling rod. In case your rod has a clamp, then you need to first open the clamp by using the handle and then roll up your hair on it. Close the clamp to keep the hair in place.
- Do not go near the roots leaving a small section of about an inch. This will prevent your roots from damage and will also protect your scalp from the hot curling rod.
- In the case of a flat iron, after removing the tangles grab a section of your hair and give it a quick brush. Now, clamp the flat iron around the section of your hair and give the section a half turn, so that your hair is now in a “U” shape.
- Hold the iron in place and move down to the hair shaft from top to bottom. If you want to get the curls from the roots then position the flat iron near the roots of the hair but make sure you don’t burn your scalp.
- If you want just the ends of your hair to get curled then position the flat iron about halfway down the hair and then begin. This is called as a flick. Slower the moves to get tighter curls and if your move down the iron too quickly, you will end up getting softer and lose curls.
7.) Keep the Rod in Place
You need to hold the curling rod in place until you get the desired curls. This will require a few seconds not more than that, regardless of the volume of your hair.
The time may vary, depending upon the temperature of your curling rod but nothing more than 10-15 seconds are required to curl your hair. Even a second more can further lead to damage so better go a second less but not more.
Once you are happy with the curled section, move on to the next sections and follow the same procedure. In case you are not satisfied with the first section, wait for a few seconds for the hair to come back to normal temperature and roll again. Hold the rod in place for a few more seconds this time than what you previously did.
8.) Loosen the Curls
Though this step is optional but, in case you want a softer appearance of your curls, try loosening them a bit using soft hands.
Run your fingers through the curls a few times, this will pull down the curls a bit eventually loosening them. Another alternative is to turn your head upside down and use your finger to run through the curls. This will fluff up your hair a bit and also separate the curls.
9.) Set Those Curls
Use a hairspray to keep those curls intact for a few hours or up till the next wash. The time period depends on upon the quality of your hair and the hairspray that is used to keep it intact.
- This spray is used to keep the curls in place and keep them from falling out throughout the day. Simply, spray the product on your hair and softly smear it all over.
- Do not use a comb or brush as this can spoil the curls. In case you want tighter springs, mist the product on each of the sections individually.
- Choose a loose hold spray so that your curls are not too stiff and the hair does not appear crunchy. Hold the can about 30-35 cm away from your hair and evenly spray it all over the desired area.
- Be careful not to apply too much of it and also never use the product while the hair is rolled up on the heating iron. The combination of heat and the chemicals in your product can fry up your hair.
