Watching all those celebrities walking down the red carpet like a diva and wearing glamorous looks is like wonders for our eyes. We always think that there must be highly skilled and professional makeup artist who work wonders on their faces using them as their blank canvas. Well, this is true for a lot of times, but, not always. It’s a bit hard to believe, but most of them are their own personal stylists. They also came up as beginners and have now emerged as pros. This all was possible with practice and getting to learn various application techniques that are used by the salon pros. So, if you also wish to carry the same look, then this article is worth reading. Here we will discuss the steps to apply eye shadow like a salon pro.
There is no one single way to apply eye shadow. Every look has a different application technique from swiping with your fingers to the mode detailed looks that can even take hours to create. Trust me, once you learn the tactics it’s not as hard as it sounds. You can easily play with either your fingertips or the applicator to create the desired looks just like the salon pros. Also, if you love wearing makeup or your work demands wearing it regularly, then it is mandatory to learn the skills as it is useless to waste every single buck for your makeup when it is a daily deal.
Once you achieve perfection in already existing styles, you can also work wonders by creating your own looks. This will give your eye a unique look that completely suits your personality.
Before we start with the steps that can help you to apply eye shadow, it is important for your to first learn about your tools. They come in many different sizes, shapes, angles and each of them has a different application technique. It can be quite challenging to choose the right kind of applicator for you, but that is what we are here for. This article will make it easy for you learn the “makeupology” and become a pro with regular practice and hard work.
Types of Brushes:
1.) A Flat Stiff Brush
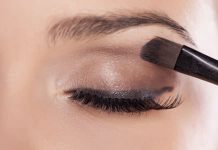
The first on the lost is this flat brush. It is mainly used for the application over your eyelids. Though, you can also use it to apply shadow under the lower lash line. This gives defined crease to the eye. You have various brands to choose from, get your favorite and start using it. Do not forget to give your feedback. It is a tool that can help you to apply eye shadow and achieve the desired look.
2.) A Pencil Brush
The second on the list comes to the Pencil Brush. Well, as the name suggests it looks similar to a pencil, eliminating the graphite lid. This type of brush is ideal for application under the eye. Its fine tip allows you to draw fine lines, especially on the crease of the eye. It is also a great applicator that helps to apply eye shadow to the outer part of the eye. This intensifies the overall eye makeup. Pencil brush is a simple tool that can help you to apply eye shadow and achieve the desired look.
3.) A Stiff Dome Brush
The pencil brush is followed by the stiff dome brush. Again, as the name suggests, the tip of the brush is similar to a dome-like structure. It is available in many different sizes to choose from. The larger size works great for a feathering out color whereas, the smaller one allows more precise application for smaller eyes. It is ideal to create a smoky eye effect but is basically used for blending the colors.
4.) A Soft Dome Brush
Where there is Stiff, soft is a must. This kind of brush is all abound blending. The softer bristles give a more delicate blend of colors. You can also use it to blend the harsh line of the concealer applied to the brow bone.
After getting familiar with the tools, it’s time to learn the different shapes. These are the outlines created with color that gives a more defined look to the eye other than simple blend and mix.
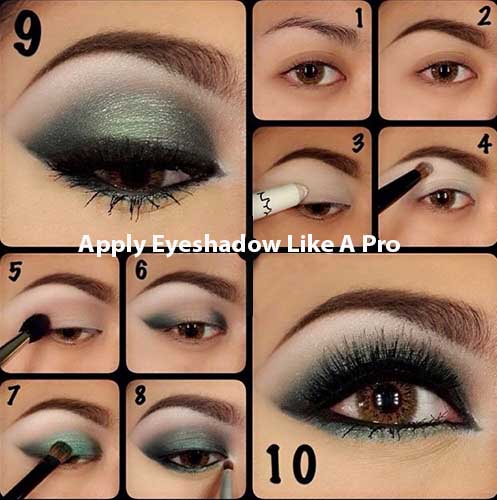
Different Techniques to Apply Eye Shadow
Contents [hide]
1.) The Fan Shape
Also known as “Divided into thirds” this type of shape effect is created with three different tones of colors. It gives a flattering look to the eyes when applied correctly, especially when both the lids meet together and the whole color effect is clearly visible.
- To achieve this look, use a flat brush and pat all the three colors on the eyelid in segments. Lighter shades on the inside part of the eye and darker ones on the outer corners.
- Now, blend the harsh line where the colors meet to get a softer and defined look. Use the same technique on the lower lash as well to complete the look.
Tool:
You need a flat stiff brush to get this look. Make sure to evenly blend those harsh lines as it is all about the “blend and mix” technique.
2.) The Snow Globe
It is an excellent shape to define your eyes, as it gives an illusion that the eyes are round in shape, regardless of your actual eye shape. Use a shimmer in the middle of the eyelid, for a more enhanced dramatic look, while using a matte shade on the inner and outer areas of the eye.
Tool:
You will need a flat stiff brush for this kind of shadow application technique. Make surely to perfectly blend the line where the colors meet.
3.) The Smokey Eye
The smokey eye look is very popular, especially among the teens these days. In order to achieve a smokey eye look, use a combination of light and dark colors.
- Simply, pat a darker shade of color all over the lower lid using the flat stiff applicator. Now, use the dome brush and take a lighter shade on it.
- Use this to blend out the harsh creases and give a soft tone to the overall look.
- These are simple tricks to apply eye shadow and achieve the desired look like a salon pro.
Tool:
You will need a flat stiff brush and a dome brush for this application technique.
4.) The Cat Eye
Another popular trend is the cat eye look and is so simple to achieve only with an eyeliner and a brush. All you need to so is, dip the brush in the eyeliner and start following the lower lash line upwards towards the outer area of your eye.
- Pull your eye upwards and apply the darkest shade shadow to the outer corner of the eye. Try making a wing of it.
- Now, use a pencil brush to soften the harsh line of the liner applied on the lower lid. Use the same applicator brush to apply the color on the top of the eye that is the eyelid.
- This type of application technique elongates the original shape of the eye, making it appear similar to a cat.
Tool:
Eyeliner brush and a pencil brush is all you need to get this cat eye look.
5.) The Cut Crease or Open Banana
Use a liner pencil to achieve this look. A chiseled brush can also create that defined line over the crease of your eyelid. Using the applicator, blend the colors well while maintaining the defined lines.
- In this type of look, use a lighter shade on the lower part of the eyelid below the crease, as this will give an edgy and sharp look to the eye.
- Using these simple tricks, you can apply eye shadow and achieve the desired look.
Tool:
Use a liner pencil and a chiseled brush for this application technique.
6.) The Closed Banana
The closed banana shape is achieved using the same techniques that we used to apply the color in The Cut Crease looks. But, with a slight difference that is quite noticeable.
In order to achieve this look, we round the edges and apply a lighter color tone on the lower eyelid. Apply the same color shadow on the lower lash as well to complete the look. These are simple tricks to achieve this look and apply eye shadow like a salon pro.
Tool:
A liner pencil and chiseled brush, as desired, to achieve the cut crease look.
7.) The Two-Color Design
The basic idea of this kind of application technique is to apply a lighter shade of color to the lid of the eye and use a darker shade on the crease. Slightly blend the areas where the colors meet.
- The lighter shade will make your upper lash look larger in size, thus creating a rested appearance.
- Use a large shadow brush applicator to apply the lighter shade on the upper eyelid. Blend the color well and smear it till the brow.
- Now, use a crease definer brush to apply the second color that is darker than the other. Dab it over the crease and blend the colors well towards the outer corner of the eye. The color line should be parallel to the edges where the brow bones meet.
- This will give a natural highlight under your brow’s arch, also shade the outer corner of the eye.
- You can use a clean blending brush to smear the color using soft circular motions. This will give a softer and diffused appearance after the color is applied to the eye.
Tool:
Large shadow brush, crease defining brush and a blending brush are enough to achieve this look.
NOTE-
For other tips and trick for applying eye shadow and makeup, keep visiting our website. Also share your feedback on our writing pieces so that we can make them more helpful for you, as we aim to serve the best of your needs.
